Showing posts with label The War Between the States. Show all posts

Thursday, August 6, 2026

A Portable Shiloh

The table set up: CSA advancing; the Union Army in their 
camps. Only one Union brigade would be allowed to 
organise automatically and at once (Peabody's); the rest
had to be diced for.


Several months ago - back in April, at the beginning of my rather slack blogging period - I played out the Battle of Shiloh on my well used, much fought over, hex battlefield. This game used the conventions I had developed for my Gettysburg battles as published in the Third Wargames Compendium (2024), and in this blog spot in January 2024. This time, though, the unit formations were brigades, rather than Divisions.

With the exception of W.T. Sherman's 5th, all Union Divisions comprised three brigades, to all of which were assigned 4 stands, and hence 4 Strength Points. All sixteen Confederate brigades were also 4SP strong. Within each Division, the artillery were concentrated in one stand, each with four-man gun crews. The Union also had an independent heavy piece close by Pittsburgh Landing.

Instead of three 4-stand brigades, Sherman got four 3-stand brigades. Actually, Stuart's brigade was separated from Sherman's main body by Prentiss's Division, and stood not far from the Tennessee River bank. It seemed reasonable to give  Stuart a cannon with a single crew figure to represent his allotment of guns.


The table set up with CSA brigades and Union 
Divisional camps labelled. 


The Armies comprised:


Union Army of the Tennessee:

Commanding: Brigadier-General Ulysses S. Grant#
1st Division: Major-Genl J.A. McClernand
    3 Brigades (Hare, Marsh and Raith) each 4 stands (each 4SP)
    1 small cavalry unit of 1 stand (1SP)
    1 cannon with 4-man crew (4SP)
2nd Division: Brig-Genl W.H.L. Wallace 
    3 Brigades (Tuttle, McArthur, Sweeny) (each 4SP)
    1 cavalry unit (1SP)
    1 cannon with 4-man crew (4SP)
3rd Division:    Major-Genl Lew Wallace*
    3 Brigades (Smith, Thayer, Whittlesey) (each 4SP)
    1 cavalry unit (1SP)
    1 cannon with 4-man crew (4SP)
4th Division: Brig-Genl S.A. Hurlbut
    3 Brigades (Williams, Veatch, Lauman) (each 4SP)
    1 cavalry unit (1SP)
    1 cannon (4SP)

5th Division: Brig-Genl W.T. Sherman**
    4 Brigades (McDowell, Stuart**, Hildebrand, Buckland) (each 3SP)
    1 cavalry unit (1SP)
    1 cannon with 3-man crew (3SP)

    1 cannon with 1-man crew (1SP)**

6th Division: Brig-Genl B.M. Prentiss
    3 Brigades (Peabody##, Miller, unattached infantry***) (each 4SP)
    1 cavalry unit (1SP)
    1 cannon with 4-man crew (4SP)
Reserve Artillery:

    1 heavy cannon with 4-man crew (4SP)

Total Army Strength: 106 Strength Points.


Notes:
* Lew Wallace's Division is a few miles away at Adamsville and Stoney Lonesome settlements. They spend almost the whole day marching to the battlefield. 


** Stuart's Brigade was separated from Sherman's camps on the right flank, beyond Prentiss's Division to the left, near the river.


*** For the purposes of this action I have supposed the unattached infantry to have been brigaded together 


# General Grant was himself not with his army as the Confederates began their early morning assault, having to board a boat to transport himself from Crump's Landing a few miles down-river.


## The Confederates managed to pull off an almost complete surprise, but one formation commander, smelling a large, hairy and early-rising rat, gathered together his brigade shortly before the attack. His was the only brigade of the 'front line' Divisions (Sherman and Prentiss) not surprised. How this is enacted will be told in due course.

Confederate Army of the Mississippi

Commanders: General A.S. Johnston (GoC); General P.G.T Beauregard (2iC)

I Army Corps: Major-Genl Leonidas Polk
    1st Division: Brig-Genl C. Clark 

        2 Brigades (Russell, A.P. Stewart) (each 4SP) 

        1 cannon (4SP)

    2nd Division: Major-Genl B.F. Cheatham 

        2 Brigades (B.R. Johnson, Stephens) (each 4SP)

        1 cannon (4SP)

    Cavalry: (1SP)

II Army Corps: Major-Genl Braxton Bragg

    1st Division: Brig-Genl Dan Ruggles

        3 Brigades (Gibson, Anderson, Pond) (each 4SP)

        1 cannon (4SP)

    2nd Division: Brig-Genl J.M. Withers

        3 Brigades (Gladden, Chalmers, J.K. Jackson) (each 4SP)
        1 cannon (4SP)

    Cavalry: (Col Joe Wheeler) (2SP)

III Army Corps*: Major-Genl Wm J. Hardee

    3 Brigades only (Shaver, Cleburne, Wood) (each 4SP)

    1 cavalry (1SP)
    1 cannon (4SP) 

IV Army Corps*: Brig-Genl J.C. Breckinridge
    3 Brigades (Trabue, Bowen, Statham) (each 4SP)
    1 cavalry (N. Bedford Forrest) (2SP)
    1 cannon (4SP) 

Total Army Strength: 94 Strength Points

Notes:
* The Corps of Hardee and Breckinridge were really only Division sized - roughly the same size as any of the Union Divisions.

The commencement of the battle, looking west to east
towards the Tennessee River
The same, looking east to west.


The Union army was attacked in its camps, only Colonel Everett Peabody (Prentiss's Division) being more or less ready to face the onslaught. He begins the battle with his brigade in the process of rallying; the rest of the Union army has to dice to rally and form up, which takes a turn to achieve. Dice rolls required a 6 for move 1, 5-6 for turn 2, 4-6 for turn 3, automatic thereafter. During the early stages of the battle, only Buckland's brigade of Sherman's Division was ready for action when Hardee's Corps struck, though at the eastern end of the line, Stuart was able to rally long before the Confederates got close.

Poor Peabody got embroiled in an unequal fight with the rest of Prentiss's Division seeming unable to sort themselves out betimes. By the time Prentiss get his command together, Peabody's brigade had gone under, and there wasn't a whole lot left of the rest of it!

Sherman's (nearest), McClernand's and Hurlbut's (distant)
Divisions still more or less recumbent.


W.H.L Wallace's Division close by Pittsburgh Landing. To the left of the 
picture, Hurlbut's Division, with McClernand in the distance.


First contact! S.A.M. Wood's brigade strikes Hildebrand's brigade (Sherman's Division)
near Shiloh Church. The surprise was enough to scatter Hildebrand's command
to the winds.


I'll probably write up only a very brief summary of events, though this refight was as eventful as the historical battle. I took far too many pictures!

To be continued...

Sunday, December 20, 2020

Rams and Ironclads - ACW Riverine Naval

  • The following is a rule set I adapted from another set published some 25-30 years ago in some magazine or other, designed for a much smaller scale.  These are designed for an 'open' (non-gridded) table. The vessels I use (still have) are roughly 1:300 scale, but would work probably better at 1:500-700 scale.

Rams and Ironclads

American Civil War River Operations

1. Equipment

Rulers, tape measures, six-sided dice (D6), models or ship 'profiles' in scale from 1:300 to 1:700, protractor with 30, 45 and 60degrees marked, ship stat sheets, movement markers.

Movement markers are square chits with a number on them.  The number signifies nominal speed, which may be modified by the current, or if the ship is reversing.  Placed immediately behind the vessel going forward, the chit is placed at an angle to indicate intention to turn.  Placed in front of the vessel indicates movement astern.  (Note, an arrow on the chit probably makes the intention clearer).
US 'City' Class ironclad gunboats, and monitor

2. Scales:

Ships approximately 1mm to 1 foot (1:300) up to 1mm to 70cm (1:700).
'Ground' scale: 1mm to 1 yard (1:900)
Time scale: 1 move to 1 minute (actual); in game terms 1 turn represents about half an hour. 

USS Lafayette and mortar barges under tow 
by an armed tugboat.


3.Movement:
  • Ships move at a rate of 3cm to 1 knot
  • River current is 2 knots.  Add 6cm to ship's move if travelling within 45 deg (degrees) of directly downstream; subtract 6cm from ship's move if travelling within 45deg of directly upstream. (Note that there is no effect upon ships travelling across the current, it being supposed the course steered by the helmsman is taking it into account ).
  • Change of speed: up to 2 knots per turn, unless otherwise stated.
  • Turning: 
    - Riverboats, up to 60deg per turn;
    - Monitors, up to 45deg;
    - Casemate Ironclads up to 30deg;
    - Tugboats and small tenders, up to 90deg.
  • To turn, pivot vessel around the centre of its stern.
  • To reverse, 1/3 'nominal' speed.
    A couple of generic riverboat steamers.  May be used for 
    rams or transports by either side.

4. Order of Play
  • Lay out Movement Markers (See 5).  Note that moves are considered simultaneous, so in intricate situations, they may have to be split further to determine events.  Experience indicated that this was rarely necessary.
  • Make half move straight ahead (see 3) adding or subtracting 1 knot for current.
  • Make the turn, if any ordered.  Dice for yawing if moving at less that the speed of the current , or adrift (tied up, anchored or aground vessels do not dice.  (This makes a turning move look like an angle, rather than a turning circle.  It seems to work!)
  • If appropriate, dice for grounding, putting out fires, repairs, etc
  • Any light guns, musketry, shore batteries, and other guns on vessels not turning, may fire.
  • Resolve ramming.
  • Complete move, if capable
  • Dice for grounding etc.
  • Any light guns, musketry and other guns that did not fire this turn, may fire.
  • Resolve ramming.
    Somewhat 'cartooned style' CSA ram
    steamers.  I call them 'cotton clads', though
    they are wanting their cladding!

5. Move Markers
  • Square counters with numbers to indicate vessel's nominal speed, and an arrow to indicate intention to move straight ahead, or to turn.  
  • These counters are placed upon the playing surface immediately behind the moving vessel, touching its stern.  When moving the vessel, leave the counter in place for the purposes of measurement, until the half-move is complete, and then bring it up to the vessel.  Note that the intention to turn is signalled at the start of the turn, not at the half-way point.
  • Adjustments to speed for current, reversing etc are made to this number on the counter.  Do not allow for current etc before selecting the speed number.
  • Absent an arrow; the top of the number indicates direction of move.  Placed at an angle indicates intention to move, and direction.

    USS Cairo moving full speed, with the river current:

    Place chit at stern = moving ahead.
    8 knots is the maximum speed of this vessel

    Half move: 12cm + 3cm for current

    Full move: 24cm + 6cm for current

    USS Cairo moving full speed, against the river current:

    Place chit

    Half move: 12cm - 3cm for current


    Full move: 24cm - 6cm for current

    USS Cairo, moving downstream, turning to starboard:

  • Chit placed at angle to indicate 
    turn, and direction of turn.
    Half move: 12cm + 3cm for current.

  • Half move: pivot by centre of the stern 
    45deg maximum for this vessel 


    Complete turn: 12 cm + 3cm (current, as still within
    45deg of directly downstream). 

6. Gunnery
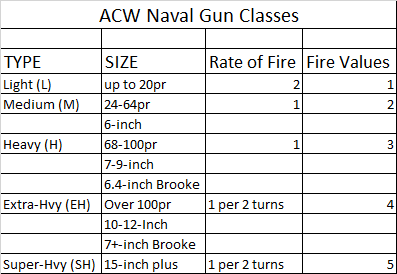
  • Gun classes:


    Ranges:
  • - Musketry (shipboard sharpshooters)      Up to 20cm
    - Grapeshot/ canister                                 Up to 20cm
    - Point Black Cannon                                Smoothbore (S/B) up to 20cm; Rifles up to 30cm
    - Effective Cannon                                    S/B over 20cm to 50cm; Rifles, over 30cm to 75cm
    - Long Range Cannon                               S/B over 50cm to 100cm; Rifles, over 75cm to 150cm

  • Arcs of fire:
    - Casemate guns - 30deg arc (within 15deg from straight ahead) (Note: a bit generous, but chosen for simplicity).
    - Barbette, deck-mounted guns and shore batteries - 60deg arc. 
    - Pivot guns, for and aft mounted may fire 120deg from centre line.
    - Pivot guns in casemate may fire in a 30deg arc from any one available gunport.
    - Guns mounted in revolving turrets may fire in any sensible direction (i.e. anything that wouldn't damage their own vessel).
    - Guns mounted in fixed turrets count as being in casemates.
    - Shipboard sharpshooters, any direction, at one target only.

  • Armour Classes
    Separate armour classes are assigned to the front, sides, rear and turrets (if any)
    - Monitor Turret ................................11
    - Ironclad over 5"-7" protection .......10
    - Shore battery in casemates ..............9
    - Ironclad over 3"-5" protection..........9
    - Shore Battery in Barbette ................8
    - Ironclad over 1" -3" protection ........8
    - Shore battery unprtected...................8
    - 'Tinclad' or Partial Ironclad ..............7
    - Cotton or wood protection ...............6
    - Unprotected.......................................5

  • Scoring Hits
    For each gun firing at a given target, roll 1 x D6 die, add the Fire Value to the score, and adjust the total as follows:

    +1 - Range Point Blank
    +1 - Target moving at 3 knots or less except shore battery (take current into account)
    +1 - Firer moving at 3 knots or less except shore battery (take current into account)
    -1 - Firing at Long Range
    -1 - New Target this turn, i.e. gun has not so far fired at all, or fired at some other target last time
    -1 - Target bow or stern on to the firer (within 30deg)
    -1 - Firer in flames or filled with steam
    -1 - Under fore from enemy shipboard sharpshooters, or from grapeshot.
    -1 - Mortar firing at stationary vessel (Note, mortars can not affect moving vessels)

    * A HIT is scored if the modified score exceeds the armour value of the target

  •  Effect of Hits
    For each hit on a vessel, roll 1xD6

    6 = Critical Hit (see below)
    5 = Lose 1 knot from top speed
    4 = Lose 1 knot from top speed
    3 = Lose 1 gun, if available, else lose 1/2 knot from top speed
    2 = Lose 1 gun, if available, else lose 1/2 knot from top speed
    1 = Lose 1/2 knot from top speed.


  • More river steamers/ ramming gunboats.  Their 
    armaments are fairly light.


Critical Hits
Roll 2xd6 and add the scores Critical damage is caused according to the following scores.

2 = Freak shot penetrate magazine; vessel blows up and sinks immediately.
3 = Helmsman, Pilot or Ship Captain killed; vessel continues on present course, with no turning (even if ordered) for one whole move (Note - if this happens in the second half of a turning move, then the vessel carries on its new course).
4 = Vessel holed below the waterline and takes on a list or goes down by the bows or stern depending upon the direction of the incoming. 

Lose 1xD6 knots

If listing, opposite side guns can not fire; if down by the bows or stern, the other end guns may not fire.  Monitors can not fire towards the 'up' side or end.

A second such critical hit does not alter the direction of tilt, but does add to loss of speed
5 = Paddlewheel or screw jammed with debris.  Vessel slows to a halt (at 4 knots per turn deceleration).  Roll 1xD6 for number of turns to clear it.  If a 1 is rolled, then the debris is cleared at the end of the turn the damage was received.
6 = Smokestack damaged - lose 2 knots from top speed.  Ship suffers -1 on further gunnery rolls (smoke everywhere!).  Further such hits reduce speed by -2 knots, but can not reduce ship's speed to below 3 knots.
7 = Single casemate gunport damaged and won't open, and gun is left out of action.  1xD6 moves to free it; the gun remaining out of action for that time.  Foe barbette or unprotected guns, lose one, reducing gunnery by one gun.
8 = Steam pipes damaged, loss of pressure.  Acceleration and deceleration reduced to 1 knot per turn.
9 = Same as 4.
10 = Steering damaged - vessel continues on same heading until repairs effected after 1xD6 moves.
11 = FIRE! - Roll 1xD6 to determine number of attempts to put it out.  One attempt is allowed per turn, a score of 6 required if afloat; 5 or 6 if aground or beached.  If the vessel is still on fire after the allowed number of attempts to extinguish, the crew abandon ship, which is left to drift and burn out.  Upon a second such critical hit whilst on fire, the crew will abandon ship immediately.
12 = Boiler holed, vessel fills with steam, and drifts to a halt (at 4 knots the turn).  Crew abandons ship on a D6 roll of 1 or 2.  Otherwise the vessel acts as a floating battery with -1 on gunnery rolls. 

Musketry and Grapeshot
  • Sharpshooters may be carried on riverboat, cottonclads, etc, but not on ironclads.  
  • Any gun may fire grapeshot or canister instead of its normal ammunition.
  • There are two possible effects:
    - Reduces enemy gunnery effectiveness;
    - Roll 2xD6 if a vessel is under musketry or (per gun) grapeshot fire.  Only a score of 3 (see critical Hits) will have any effect.

Firing on Shore battery:
  • If a hit is scored, roll 1xD6.  A 6 knocks out one gun.
    A steam ram, probably in the service of the US 
    navy.  Something like the 'Ellet' rams.

7. Ramming
  • If one vessel rams another, or a collision occurs, the ramming vessel rolls 1xD6.
  • If the collision is bow-to-bow (within a 45deg angle of straight ahead) both sides are considered to be ramming.  In this case ignore penalties to the rammer on scores of 4+.
  • The bonus for having a ram bow is allowed only if the rammer's stem is in contact with the target vessel
  • If a collision occurs with neither bow in contact, both sides roll 1xD6 without adjustment.
  • To the dice rolls, make the following adjustments:
    +1 - Target stationary (drifting, at anchor, or tied up)
    +1 - For every 2 knots over 6 actual speed  ramming vessel travelling (i.e. allow for current)
    +1 - Target side on to rammer within 45deg of perpendicular
    +1 - Rammer equipped with a ram bow
    -1 - Rammer's bow not reinforced
    -1 - Each knot under 4 actual speed rammer is moving
    -1 - bow to bow collision within 45deg of straight ahead

  • Effect of scores:
    6+ = Target loses 2xD6 knots. Vessel slows to this speed if the way forward is clear, else is halted (See 9.  Endurance).  Rammer is halted (for the moment), and loses 1 knot from its top speed.
    4-5 = Target loses 1xD6 knots from top speed; Rammer loses one knot.
    2-3 = No effect
    1 = Rammer loses 1xD6 knots.

8. Torpedoes (Mines)

  • Subsurface torpedoes may be arranged in singles, in 'minefields' or be set adrift
  • In any action, the first occasion that the effect of a particular torpedo or minefield needs to be known, roll 1xD6.  Call the resulting number 'T'.
  • For this and subsequent occasions this torpedo of field is crossed, roll 2xD6.  If the resulting score is less than or equal to 'T' the torpedo explodes, with the following dire consequences:
    5-6 = Vessel loses 3xD6 knots, 1 critical hit (See 9.  Endurance)
    3-4 = Vessel loses 2xD6 knots, 1 critical hit
    1-2 = Vessel loses 1xD6 knots.
  • Single torpedoes, having exploded, have no further effect.  (Note that if 'T' = 1, the torpedo or minefield, is a complete dud.)

  • Spar Torpedoes 
    - A boat or vessel armed with spar torpedoes can not ram and set off its torpedo in the same move.
    -  When a spar torpedo is applied, roll 1xD6
    4-6 = Torpedo explodes under target vessel.  Roll 1xD6 for effect as above
    2-3 = Torpedo fails to explode
    1 = Torpedo gets caught under its own vessel and explodes.  Roll 1xD6 for effect, as above.
    CSS Tennessee - I see there is still work
    needed on this one.

9. Endurance
  • Any vessel whose top speed is reduced to 0 as a result of enemy action, slows to a halt at 4 knots per turn, and drifts with the current.  Each turn, dice for yawing (1,2 = to port; 5,6 = to starboard)
  • Yawing counts as a maximum turn for the type of vessel under consideration
  • If the vessel's top speed drops below 0, the vessel is sinking.   A sinking vessel goes down in 5 + 1xD6 moves.
  • A vessel's top speed may be reduced to 0 or less, but because deceleration when not under power is 4 knots per turn, it may still have sufficient way on to beach itself if close enough to the shore.
  • Instead, a dead in the water of sinking vessel may be taken in tow, to prevent sinking by towing towards the shore, say.
  • A beached or grounded vessel that has 'sunk' is salvageable.
  • A sinking vessel may be hastened on its way to the bottom by further reduction in 'speed' by sinking 1 move early for each further knot in speed lost.  It can therefore go under halfway through a move.
10.  Grounding
  • Except where defined, rivers shoal towards their banks, islands and sandbanks.  Other shoal water may be defined, as required.
  • Whenever any part of a vessel passes closer to the riverbank than its draught expressed in centimeters, it is in danger of running aground.  Roll 1xD6.  If the score is less than or equal to the difference between the vessel's draught and its distance in cm from the shore, the vessel runs aground.  This roll is made as and when it is necessary at the half-way or end point of a move.
  • On subsequent moves, efforts may be made to free the vessel, with a score greater than the draught and distance being required, except that a '6' always frees a vessel.  This roll is made in the middle of a move.
  • Once freed from grounding, the vessel has half a move to get get clear, else it must dice again.  A freeing move may include a turn.
  • A vessel actually touching the riverbank must be towed off unless it is in a recognised anchorage.

    Towing... 

11. Towing
  • It takes one move for a vessel to take one other in tow. To signify being in tow, the bow (or stern) of the towed vessel must be in contact with the stern (or possibly bow) of the towing vessel. Note that towed vessels may be towed stern first, and towing vessels my tow in reverse.
  • To pass a towing line between vessels, the appropriate ends of the vessels must be less than 3cm apart.  
  • Towing reduces the nominal speed of a vessel by 1 knot per 5cm or part thereof in length of the towed vessel (and 1 further knot for every vessel more than one being towed {e.g. a string of mortar barges}).
  • Tugs are specialists in towing or pushing.  They may bush one vessel, or tow up to three (reductions in speed permitting).
  • Tugs' top speed is 11 knots, and they may reverse at half nominal speed.
  • Tugs have reinforced bows, are otherwise unprotected, and may mount up to 1 light gun.
12. Ship Stats (Sample)


CSS Tennessee.


Copyright, Archduke Piccolo (Ion A. Dowman)


Saturday, June 3, 2017

Frivolous Fellows... (Interlude)

In a previous posting, much earlier in the year. I received a comment that seemed to cast aspersions upon the brigade commanded by Brigadier-General Daniel P. Tyler - the IVth of that name.

Frivolous Union  fellows giving the Army of
the Valley (CSA) a hard time.
My reply:
"I have to admit that the figures in Tyler's brigade were never my favourites.  'Frivolous fellows for serious work,' General T.J. Jackson might have said.  I find them surprisingly photogenic, though. They were also a useful source of subaltern command figures and flag bearers..."

I have another Union brigade of 'stabbing down' guys.  Haven't a clue what they are supposed to be doing, actually.  I suppose one could not fault them for lacking a determined look.  In fact, so unappealing are those guys, that I still haven't given them a 'finished' look.  But, waste not, want not; one can not allow a whole brigade to go to waste!

Have you ever noticed, though, that you kinda despise your unfavourite units, and make them into the most brittle types of conscripts, militia, and assorted military, just to drive the point home.  And then these guys stick a finger up the nose of your prejudice, fight like demons, break and run only after extreme provocation, and, if and when they do, rally in a trice like a box of birds?  Meanwhile your pets run into a little hot stuff, squawk, vanish, and if after a long while you do manage to drag them back into the fray, like as not, it will be 'Ho, for the tall timber!' at the slightest hint of incoming (Reason for reaction test: first casualties after rallying from rout).
Regiment of Airfix figures.
(Posted in Archduke Piccolo, January 2010)
I'd probably be inclined to 'hide' the wonky poses among others by mixing the figures in each unit. Here's a thing, though.  Consider the old ESCI or Revell figures.  Individually fairly characterless,  the different poses in single unit give the whole a dynamic look.  The regiment or battalion becomes full of character.  Apart from the standing and kneeling firing, you can't really do that with the Airfix figures.  Individually loaded with character (even the frivolous guys and the 'stabbing down' dudes), a 'mixed pose' Airfix  unit looks simply a mess - in my view.  Even the shooting guys have to stand formally with the kneeling guys in the front rank, and the standing in the second.
Regiments of ESCI figures.
(Posted in Archduke Piccolo, January 2010)
Note that this applies to the infantry only: the Airfix 'Seventh Cavalry' used as the major source of horsemen look fine in mixed units.  Just as well: otherwise one would be buying a heck of a lot of boxes of ten figures apiece!  Mind you, I have at least sixteen boxes of Airfix represented, augmented by one box of Atlantic

Later in the Stonewall in the Valley campaign , if and when General Fremont's Division puts in an appearance, we might see some of my 'mixed' figure ESCI units

Friday, February 10, 2017

Stonewall in the Valley 10: Battle of Passage Creek concluded/

Situation on the southern wing - the Confederate right.
Kust visible on the extreme right can be seen dismounted elements
of Col Munford's cavalry

The arrival of the three Confederates Brigades of Taliaferro, Trimble and Taylor on the left and centre of the field tended rather to shunt Winder's 'Stonewall' Brigade off to the right, facing Barnett's barn and the nearby woods and hill.  Fortunately, Munford's 2nd Virginia Cavalry, accompanied by Captain Chew's 'flying' artillery joined them there (this determined by dice rolls).  Whilst Chew's rifled guns engaged the Union horse and artillery on the hill, 27th Virginia Infantry rallied and rejoined the rest of the Brigade, and Munford's cavalry dismounted, formed a skirmish line, and plunged into the woods behind Turvey's place (just visible in the above picture).  Although Ashby's cavalry had arrived in the centre, Jackson directed them to support General Winder.
...
33rd Virginia and 21st North Carolina in action.


Heavy blows delivered and received.

Meanwhile, on the rest of the embattled front, events seemed to be turning in favour of the Union.  Both sides seemed to be wilting under the deadly fire, to the extent that on both, the morale and endurance of five regiments came into question.  For all ten units, a dice roll would determine how they would respond to events. The Union rolls, north to south went: 3,3,4,5,2. The last was a failure, but only enough to stop that unit advancing as it had been doing.


The Confederate rolls were much less fortunate.  Again north to south, they went 4, 1, 1, 2, 1 - disaster!  In the woods on the extreme left, 23rd Virginia stood up to the strain well enough, but 37th Virginia, and almost the whole of Trimble's Brigade, were driven back.  The advance of 21st North Carolina was halted, but 21st Georgia fell back, and 15th Alabama, whose enthusiasm in closely engaging the enemy more than made up for their early morning failure, once more suddenly broke apart and fled in confusion.
Musketry and gunnery duels in the centre.
'Stonewall' Brigade in action.  Reinforcement appearing
in the picture.

Having shaken themselves out into a semblance of order, the Stonewall Brigade resumed its advance, 27th Virginia into Barnett's field, whilst 5th Virginia engaged the Union battery on the hill to the right. Coming under return gunfire, 5th Virginia were taking heavy losses - in fact little more than 50% of the men remained with the colours at the close of the action.  Yet that gallant regiment stood its ground and returned a musketry so effective as eventually to silence the battery altogether.  

The Union horse alongside the battery never really got the chance to redress matters.  A popping fire of carbines from the woods to the left front revealed the presence of dismounted rebel cavalrymen; 33rd Virginia, alongside Chew's battery, supported the 5th from its right rear, and a large body of horsemen, distant as yet, were rapidly approaching from the right front.  In the face of such a variety of threats, a kind of paralysis seized the Union cavalry.


In fact at about this time, I considered calling the battle, as it was already clear to me that the decisive action was going to happen on the Confederate right.  But Union successes so far mitigated against such a decision.  I felt that General Shields would see the battle going pretty well, and would stay with it.


It would be a costly decision.  Though their first attacks had been checked, if not altogether repulsed, the Confederates had plenty of reserves.  The 6th and 7th Louisiana of Taylor's Brigade soon took up the cudgels dropped by Trimble's Brigade.  Having recovered its aplomb, 10th Virginia also rejoined the 23rd in the railroad woods, where their combined firepower gradually overcame that of 5th Ohio.


In the midst of the roar of battle, as he stood on horseback closely observing the action, General Shields was struck by a Minie ball that flung him out of the saddle.  The wound was mortal (determined by die roll, ranging from '1' - slight, requiring dressing but able to remain in command - to '6' - immediately fatal; I rolled a '5').  As Shields was carried from the field, Brigadier Kimball took over direction of the battle.

(In my combat system, dice rolls for firing determine the number of 'hits' on the target, which are then resolved into 'casualties' (dead, wounded, missing, straggled, skedaddled, and carrying wounded to the rear, and what have you).  In resolving hits into casualties, if double-6s appear, regimental officers are laid low, which can affect the unit's cohesion in subsequent 'reaction' tests.  But triple-6s affect any General officer who happens to be standing within 5cm of the target unit.  So it happened here.)

It was not long before 23rd Virginia felt itself sufficiently emboldened to emerge from the woods to engage 5th Ohio more closely.  The 10th had rejoined the firefight, and the 5th Ohio, in front of them was feeling the heat.
Taliaferro's Brigade pressing back the Union right.

General Shields takes a hit.

In the centre the firefight continued - a real battle of attrition, though for neither commander was this a desirable proceeding. General Jackson in particular had to be acutely aware that somewhere less than a week's march distant, General Fremont's Mountain Department Army was at large and unchecked. It would not do to be forced out of the Shenandoah valley because the last couple of days had so weakened his army it could not face Fremont's column.


Cavalry battle on the ridge.

Developments on the southern wing were more to the liking of 'Old Blue Light' Jackson.  As the Stonewall Brigade began pressing, Ashby's cavalry (7th Virginia) nerved themselves to charge the 1st Rhode Island on the hill.  Under cover of the charge, Col. Munford's dismounted troopers emerged from the woods and began to climb the slopes flanking the Union horse. 
Collapse of the thinly held Union left.

Although the Federals had the slope of the Confederates, the latter had the numbers.  As it happened, the latter exacted a full revenge for its misfortunes earlier in the day and routed the Rhode Islanders right off the hill.  Sorely depleted, the survivors of Battery L, 1st Ohio Artillery also made off.  
7th West Virginia comes until heavy pressure.

This left a vacuum on the Union right flank, guarded only by the woods back of Barnett's barn, where 7th West Virginia was conducting a lone fight against 5th and 27th Virginia.  Within the cover of the woods, the West Virginians were able for over an hour to hold their own despite the slight numerical superiority of their opponents.  The hill once cleared brought in 33rd Virginia and the dismounted troopers of 2nd Virginia Cavalry over and around the heights onto the West Virginians' left flank.

As General Trimble rallies a broken unit, the Union centre
 breaks of the action under cover of a cavalry charge.
The writing on the wall must have been abundantly clear to General Kimball by now.  The early successes on his right and centre were beginning to become undone, as rebel reserves joined in the fight, and their fire began to be felt.  True, the Union had reserves also, but as holes began to appear in their turn in the Union lines, they were soon used up.  
Taylor's Brigade (6th and 7th La) about to storm the Union
defended hill.  Sixth La is looking very depleted, but
morale remained strong.
It did not help the Union cause that Brigadier Trimble had reorganised his Brigade fairly quickly after his earlier reverses.  To be sure, the North Carolinians and Georgians had never lost their good order despite being driven back.  For their part, 15th Alabama pulled itself together a deal more rapidly than it had earlier in the day.  In sum, therefore, Trimble's Brigade was ready one more to try conclusions.
Rallied CSA regiments ready to try a second round...


Charge of 1st Maine Cavalry

The crumbling Union line no longer had that luxury.  As losses mounted, cohesion became more difficult to maintain.  Tyler's, and then Kimball's, Brigades began to be edged back as the Confederates stepped up the pressure. Suddenly the 5th Ohio infantry broke and scattered, signalling an imminent collapse of the Union right.  In desperation 1st Maine Cavalry - part of Col Knipe's column that had remained on this wing to support Tyler - flung themselves upon the Confederate line.  

Although with pistol and sabre they lowered a few rebel infantry, the latter had emptied too many saddles during the charge itself, for the Union horsemen to hope to impose more than a brief delay.  The survivors joined the growing exodus from the field.


The fatal charge of 1st W. Va. Cavalry
That general retreat spread to the centre as General Kimball acknowledged that the game was up, and it was time to preserve what he could of his command.  Hoping to catch the Confederates on the hop, he flung in the West Virginia cavalry against the line of Confederate artillery astride the ride near Barnett's field.  Had the Napoleon battery not had taken earlier losses the execution by the CSA guns would have been catastrophic (the horse would have taken eleven hits) but as the battery was down to 3 crew figures, the 'Die Range' was only 5, to the roll of '6' was a 'miss'.  The '5' rolled by the companion battery was within the  'Die Range' for rifled guns firing canister at point blank range. That was bad enough for the cavalry, who didn't even close, but made off hurriedly down the road.
Respective losses to 1st Me Cav and
23rd Va.
The afternoon was now far advanced, perhaps two hours of daylight remained as Shields's - now Kimball's - command quit the field.  Losses had been heavy on both sides, but, as the battle progressed, the fortunes though favourable to the Union to begin with, had swung decisively and irreversibly in favour of the Confederacy. 
Crumbling Union defence line...

There was no pursuit.  The Army of the Shenandoah had had a hard twenty-four hours, and in the process had thrown back two of the Union columns sent to drive them from the Valley.  It was enough that the rebels could reach the southern turnoff and restore their lines of communication.  For their part, the Federals would not reach Front Royal until the following morning.  Nor would they stop there.  Desiring to return to his parent Division, Col Knipe drew his command back to Cedarville.  For his part, perhaps shaken by the day's events, and the loss of General Shields, on the morrow Kimball took his Division back to the Blue Ridge Mountains, though the Manassas Gap and stopped only upon reaching Piedmont town late in the afternoon.

Of the movements of the Army of the Shenandoah, we'll have to wait for the next instalment of Stonewall in the Valley.

To be continued...